Data types of Mat
| Name | Data Type | Bit Size | Range | Other |
|---|---|---|---|---|
CV_8U |
uchar / unsigned char | 8 | 0 ~ 255 | Default for image data |
CV_8S |
char | 8 | -128 ~ 127 | |
CV_16U |
ushort / unsigned short int | 16 | 0 ~ 65535 | unsigned short |
CV_16S |
short int | 16 | -32768 ~ 32767 | short |
CV_32S |
int | 32 | -2147483648 ~ 2147483647 | long |
CV_32F |
float | 32 | \(1.18\times10^{-38}\) ~ \(3.40\times10^{38}\) | |
CV_64F |
double | 64 | \(2.23\times10^{-308}\) ~ \(1.79\times10^{308}\) |
Conversion between Mat and IplImage
IplImage *toMat:1
2IplImage *ipl_img;
Mat mat_img(ipl_img);IplImagetoMat:1
2IplImage ipl_img;
Mat mat_img = cv::cvarrToMat(&ipl_img, true);MattoIplImage:1
2Mat mat_img;
IplImage ipl_img = mat_img;
Access pixel intensity values of images
Mat(e.g.Mat img)Grayscale (
8UC1)1
uchar intensity = img.at<uchar>(y, x);
Color image (BGR color ordering, the default format returned by
imread)1
2
3
4Vec3b intensity = img.at<Vec3b>(y, x);
uchar blue = intensity.val[0];
uchar green = intensity.val[1];
uchar red = intensity.val[2];Note: the same method can be used to change pixel intensities.
IplImage(e.g.IplImage* img)Grayscale
1
uchar intensity = CV_IMAGE_ELEM(img, uchar, h, w);
Color image
1
2
3uchar blue = CV_IMAGE_ELEM(img, uchar, y, x*3);
uchar green = CV_IMAGE_ELEM(img, uchar, y, x*3+1);
uchar red = CV_IMAGE_ELEM(img, uchar, y, x*3+2);
Content transform between Mat row/col and vector
Matrow/col toMatrow/col
cc: http://opencv.willowgarage.com/documentation/cpp/basic_structures.html1
2
3
4
5
6
7// add 5-th row, multiplied by 3 to the 3rd row
M.row(3) = M.row(3) + M.row(5)*3;
// now copy 7-th column to the 1-st column
// M.col(1) = M.col(7); // this will not work
Mat M1 = M.col(1);
M.col(7).copyTo(M1);Matrow/col tovector1
2
3
4
5
6
7
8
9
10
11
12
13
14
15Mat data(2, 2, CV_32F);
data.at<float>(0, 0) = 1;
data.at<float>(0, 1) = 2;
data.at<float>(1, 0) = 3;
data.at<float>(1, 1) = 4;
// copy second row data to p
vector<float> p;
data.row(1).copyTo(p);
// copy second col data to p2
Mat data_transpose;
transpose(data, data_transpose);
vector<float> p2;
data_transpose.row(1).copyTo(p2);
About cv::Rect
Note that, the top and left boundary of the rectangle are inclusive, while the right and bottom boundaries are not.
- For
cv::Rect rect(x,y,w,h), its right bottom corner isrect.br() = cv::Point(x+w, y+h), notcv::Point(x+w-1, y+h-1) To loop over an image ROI in OpenCV (where ROI is specified by
rect) is implemented as:1
2
3
4
5for(int y = roi.y; y < roi.y + roi.height; y++) {
for(int x = roi.x; x < roi.x + roi.width; x++) {
// ...
}
}
About CvBox2D
The definition of CvBox2D in OpenCV 2.1 is as follows:
1 | typedef struct CvBox2D |
However, there are several inconsistencies when using in practice (i.e. angle), where I found that:
center: no problem.size, take care of two things:sizeis for the full size, notthe half size. (Extremtly useful for ellipses respresented byCvBox2D).sizeis consisted ofwidthandheight. Note that no perticular garantee for the size relationship amont the two (who is larger), on the other hand, it seemsheightwill be always larger thanwidthobtained by default (need to verify!!!)
angle, several issues:- Type: not
radians, degrees instead. - Meaning: not
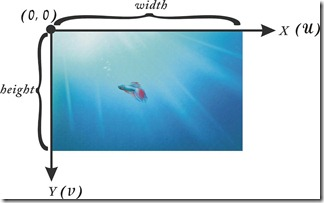
angle between the horizontal axis and the first side (i.e. length), the angle anticlockwisely from -y($\uparrow$) direction ( see the image plane in the following figure) to the first length edge instead. Range: can be any size, but with cycle period of 180 (\(\pi\)), so better to first normalize to [0, 180) in practise.

- Type: not
About Sobel operator
When using the following old version:
1 | CVAPI(void) cvSobel( const CvArr* src, CvArr* dst, int xorder, int yorder, int aperture_size CV_DEFAULT(3)); |
, remember that, for dst (need to be created by using cvCreateImage), only IPL_DEPTH_32F can be used, which is different from OpenCV’s documentation.
For new version (together with the old version):
1 | CV_EXPORTS_W void Sobel( InputArray src, OutputArray dst, int ddepth, int dx, int dy, int ksize=3, double scale=1, double delta=0, int borderType=BORDER_DEFAULT); |
, remember that the following two versions will give the same result
Old version
1
2
3
4
5IplImage *xsobel, *ysobel;
xsobel = cvCreateImage(cvSize(in->width, in->height), IPL_DEPTH_32F, 1 );
ysobel = cvCreateImage(cvSize(in->width, in->height), IPL_DEPTH_32F, 1 );
cvSobel(img_gray, xsobel, 1, 0, 3);
cvSobel(img_gray, ysobel, 0, 1, 3);New version
1
2
3Mat xsobel, ysobel;
Sobel(img_gray, xsobel, CV_32F, 1, 0, 3, 1, 0, BORDER_REFLECT);
Sobel(img_gray, ysobel, CV_32F, 0, 1, 3, 1, 0, BORDER_REFLECT);